


WYSIWYG WEB BUILDER IMAGE MAPS

WYSIWYG WEB BUILDER IMAGE MAPS
Image Maps for WYSIWYG Web Builder
An up to date tutorial for the latest versions.

Creating an image map with WYSIWYG Web Builder is somewhat different than with other website design programs.
With that said, it provides a stable, easy to use, and workable solution to your website navigational needs.
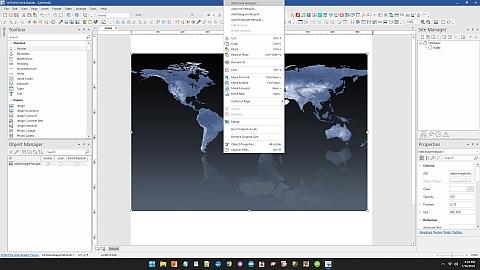
First we go to the "Insert" section of the pull down menu and select "image" then "Image Map."
The first step is to allow you to select an image to create a map over. This can be any image, or image type.
With that said, it provides a stable, easy to use, and workable solution to your website navigational needs.
First we go to the "Insert" section of the pull down menu and select "image" then "Image Map."
The first step is to allow you to select an image to create a map over. This can be any image, or image type.
Second, we can include Icons to our Image Maps.
The image tool will by default draw a rectangle over the image to be mapped.
Here you can include a Icon or another image over the first image to represent the navigational location of the image.
The image tool will by default draw a rectangle over the image to be mapped.
Here you can include a Icon or another image over the first image to represent the navigational location of the image.

Creating an image map with WYSIWYG Web Builder is somewhat different than with other website design programs.
With that said, it provides a stable, easy to use, and workable solution to your website navigational needs.
First we go to the "Insert" section of the pull down menu and select "image" then "Image Map."
The first step is to allow you to select an image to create a map over. This can be any image, or image type.
Second, we can include Icons to our Image Maps.
The image tool will by default draw a rectangle over the image to be mapped.
Here you can include a Icon or another image over the first image to represent the navigational location of the image.
Third, you can use a small transparent .GIF or .PNG file instead of a ICON. This will allow you to use different shapes over the transparent image.
You can create a small 15 x 15 .GIF or .PNG and resize it to cover almost anything on the basic map you wish to.
This will allow you to create the various shapes built into the image map feature of WYSIWYG Web builder.
You can even mix and match images, Icons, etc., to indicate where the image map is on your website.
Once you start to play with it you will notice how easy it is to build a sucessful navagation tool with Web Builder Image Map tool.
Like the "Home Brew" navigational cards article here on this site you can also use "Shapes" from the Toolbox menu. Loads of options!